> ## Documentation Index
> Fetch the complete documentation index at: https://koreai-agent-management-platform-dev.mintlify.app/llms.txt
> Use this file to discover all available pages before exploring further.
# Linked Services
Linked Services lets you connect Agent AI with external services to extend its capabilities.
| Service | Description |
| -------------------------- | ------------------------------------------------------------------------------------------- |
| **Search AI** | Enhances Agent AI's search capabilities across web and mobile platforms. |
| **Agentic Configurations** | Configure and manage Agentic Copilot apps for autonomous, end-to-end conversation handling. |
***
## Search AI
Search AI provides intelligent, contextual, and personalized search in every interaction. Agents access results from all linked sources through the **Search** tab in the Agent AI widget.
### How It Works
1. **Set up Search AI Apps** — Add information sources (internal, external, auto-suggestions) such as web pages, documents, and content from apps like ServiceNow and Confluence.
2. **Link Search AI with Agent AI** — Administrators can link up to three Search AI apps. Once linked, Search AI content is available in the Agent AI widget automatically.
3. **View results in the widget** — Agents see snippets and articles from Search AI, and Dialog Tasks and FAQs from the XO Platform.
When you link Search AI, agents can review results and share relevant information with customers. The integration also supports sending internal-only notes that agents can't copy or share with customers.
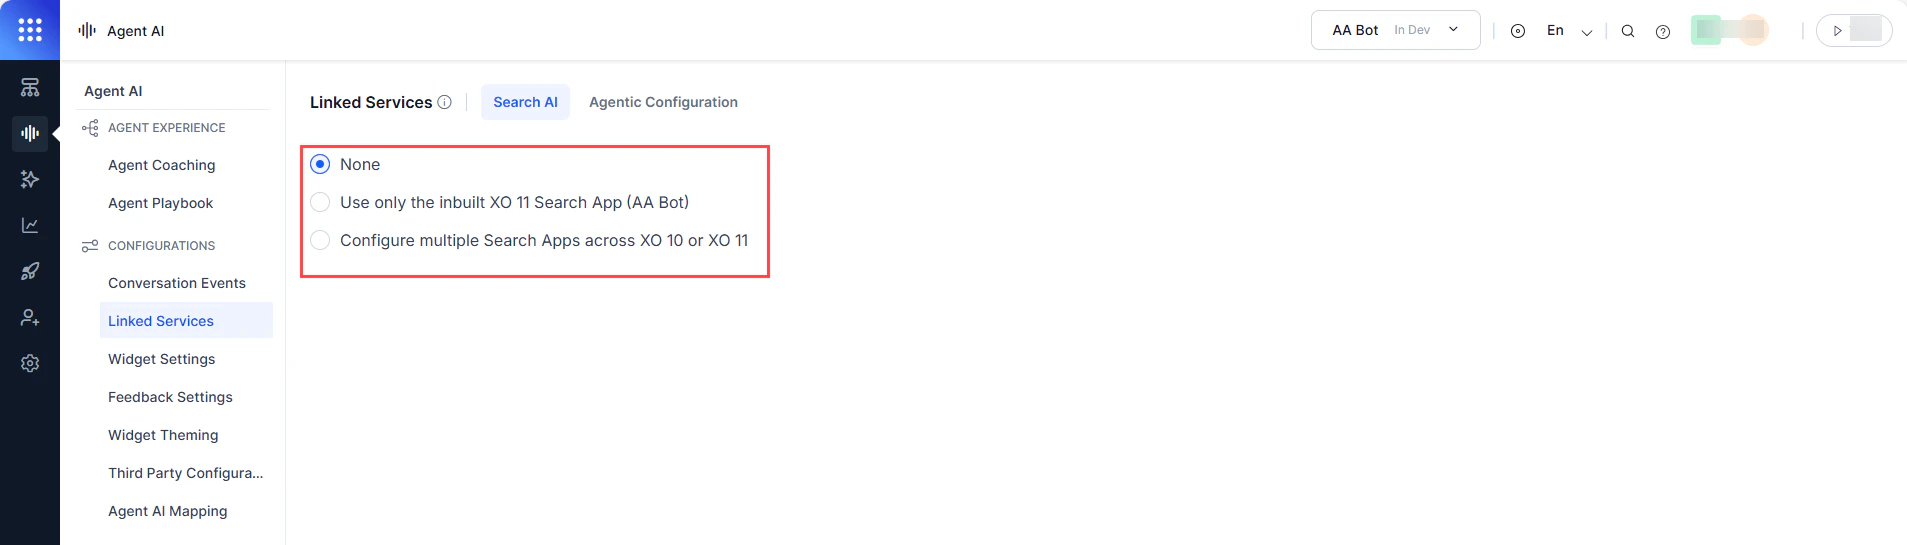
### Search AI Options
| Option | Description |
| -------------------------------------------------------- | -------------------------------------------------------------- |
| **None** | Disables Search AI; results come only from the configured bot. |
| **Use only the inbuilt XO 11 Search App (AA Bot)** | Uses the built-in XO 11 Search AI app. |
| **Configure multiple Search Apps across XO 10 or XO 11** | Configure up to three custom Search AI apps. |
 ***
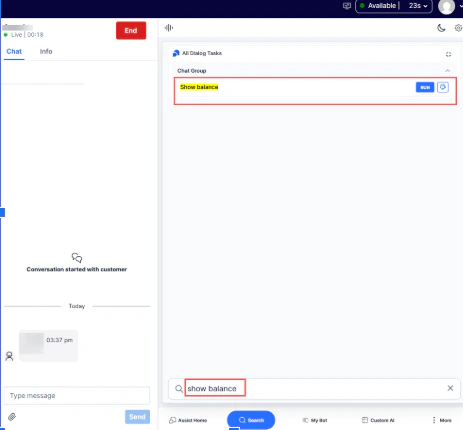
### None
Restricts search to the configured bot only. If a search query doesn't match bot content, **No Search Result Found** appears. If the query matches bot content (such as dialog tasks), matching results appear.
***
### None
Restricts search to the configured bot only. If a search query doesn't match bot content, **No Search Result Found** appears. If the query matches bot content (such as dialog tasks), matching results appear.
 ***
### Use Only the Inbuilt XO 11 Search App
Uses the built-in Search AI app linked to your XO 11 sign-in. Select this to configure internal or external information sources and customize how the app retrieves and presents information.
**Steps:**
1. Sign in to AI for Service.
2. Go to **Agent AI** > **Linked Services** > **Search AI**.
3. Select **Use only the inbuilt XO 11 Search App (AA Bot)**.
4. Expand the **Search App** section, select **Internal Information** or **External Information** in **Use This App Settings for**, then select **Okay**.
5. Expand the **Knowledge AI** section.
1. Turn on the **Knowledge Settings** toggle.
2. Select a channel in the **Select channel** list.
3. Configure the **Search Results** and **Control expand behavior of Answers** options.
4. Optionally, select **Add Custom Meta Filter Script** under **Advanced Search API Configuration**, select **Add Script**, enter your script, and select **Save**.
6. Select **Save**.
You must enable **Answer Generation** to use the inbuilt XO 11 Search App.
**To enable Answer Generation:**
1. Go to **App Settings** > **Configurations** > **Dev Tools** > **API Scopes**.
2. Select the edit icon next to an existing JWT App.
3. On the **Edit App Definition** page, turn on the **Answer Generation** toggle.
4. Select **Save**.
***
### Configure Multiple Search Apps
Configure up to three Search AI apps across XO 10 or XO 11. Restrict search capabilities for specific users and assign scopes to each app.
#### Search App Scopes
| Scope | Description |
| ------------------------ | ----------------------------------------------------------------------------------------------------------------------- |
| **Internal Information** | Sends only internal notes to agents. **Send** and **Copy** buttons are unavailable — agents can't share with customers. |
| **External Information** | Fetches external information through Search AI. Includes **Send** and **Copy** buttons for sharing with customers. |
| **Auto-Suggestions** | Shows relevant past search entries as the agent types. Available for XO 10 only. |
**Steps:**
1. Sign in to AI for Service.
2. Go to **Agent AI** > **Linked Services** > **Search AI**.
3. Select **Configure multiple Search Apps across XO 10 or XO 11**.
4. Select **+ Add Search AI App**.
***
### Use Only the Inbuilt XO 11 Search App
Uses the built-in Search AI app linked to your XO 11 sign-in. Select this to configure internal or external information sources and customize how the app retrieves and presents information.
**Steps:**
1. Sign in to AI for Service.
2. Go to **Agent AI** > **Linked Services** > **Search AI**.
3. Select **Use only the inbuilt XO 11 Search App (AA Bot)**.
4. Expand the **Search App** section, select **Internal Information** or **External Information** in **Use This App Settings for**, then select **Okay**.
5. Expand the **Knowledge AI** section.
1. Turn on the **Knowledge Settings** toggle.
2. Select a channel in the **Select channel** list.
3. Configure the **Search Results** and **Control expand behavior of Answers** options.
4. Optionally, select **Add Custom Meta Filter Script** under **Advanced Search API Configuration**, select **Add Script**, enter your script, and select **Save**.
6. Select **Save**.
You must enable **Answer Generation** to use the inbuilt XO 11 Search App.
**To enable Answer Generation:**
1. Go to **App Settings** > **Configurations** > **Dev Tools** > **API Scopes**.
2. Select the edit icon next to an existing JWT App.
3. On the **Edit App Definition** page, turn on the **Answer Generation** toggle.
4. Select **Save**.
***
### Configure Multiple Search Apps
Configure up to three Search AI apps across XO 10 or XO 11. Restrict search capabilities for specific users and assign scopes to each app.
#### Search App Scopes
| Scope | Description |
| ------------------------ | ----------------------------------------------------------------------------------------------------------------------- |
| **Internal Information** | Sends only internal notes to agents. **Send** and **Copy** buttons are unavailable — agents can't share with customers. |
| **External Information** | Fetches external information through Search AI. Includes **Send** and **Copy** buttons for sharing with customers. |
| **Auto-Suggestions** | Shows relevant past search entries as the agent types. Available for XO 10 only. |
**Steps:**
1. Sign in to AI for Service.
2. Go to **Agent AI** > **Linked Services** > **Search AI**.
3. Select **Configure multiple Search Apps across XO 10 or XO 11**.
4. Select **+ Add Search AI App**.
 5. Enter a name in the **Name** field.
6. Select a version (**XO10** or **XO11**) in **Select Version**.
7. Select one or more options in **Use This App Settings for**. See [Configuration Rules](#configuration-rules).
Auto-Suggestions is not available for XO11 apps.
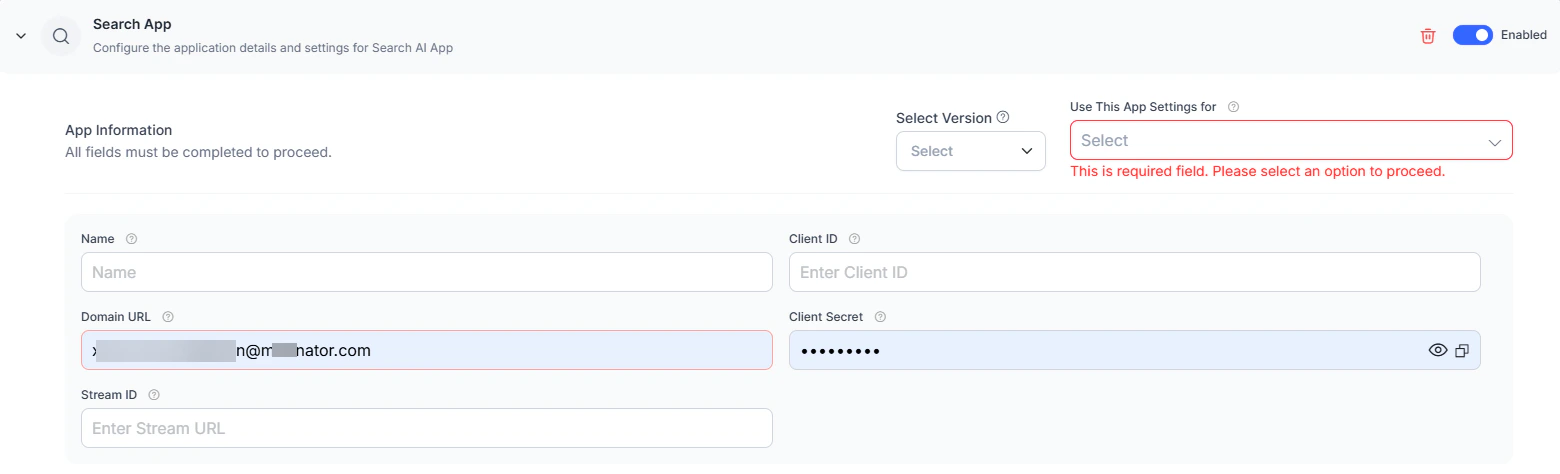
8. Enter the client credentials from your Search AI application:
| Field | Description |
| ----------------- | -------------------------------------- |
| **Domain URL** | The domain URL for this search app. |
| **Stream ID** | The stream ID for this search app. |
| **Client ID** | The client ID for this search app. |
| **Client Secret** | The client secret for this search app. |
9. Expand the **Knowledge AI** section (shown only when **Internal Information** or **External Information** is selected).
1. Turn on the toggle.
2. Select a channel.
3. Configure **Search Results**, **Pass Meta Data**, and **Control expand behavior of Answers**.
4. Optionally, add a custom meta filter script under **Advanced Search API Configuration**.
10. Select **Test Connection & Save**. A success message confirms the connection.
11. Repeat to add more Search AI apps.
#### Configuration Rules
* Choose either **Internal Information** or **External Information** with **Auto-Suggestions** — not both.
* You can't combine **Internal Information** and **External Information** in one app.
* **Auto-Suggestions** is available only for XO 10 apps.
* **Knowledge AI settings** appear only if you select Internal or External Information.
#### Knowledge AI
Knowledge AI settings let you control how search results from the Knowledge AI integration appear in the widget.
| Setting | Options |
| -------------------------------------- | ------------------------------------------------------------------------------------------------------------------------------------------------------------------------------------------------------------------------------------------------------------------------------------------------------------- |
| **Search Results** | **Always Show** (default) — shows all Knowledge AI results.
5. Enter a name in the **Name** field.
6. Select a version (**XO10** or **XO11**) in **Select Version**.
7. Select one or more options in **Use This App Settings for**. See [Configuration Rules](#configuration-rules).
Auto-Suggestions is not available for XO11 apps.
8. Enter the client credentials from your Search AI application:
| Field | Description |
| ----------------- | -------------------------------------- |
| **Domain URL** | The domain URL for this search app. |
| **Stream ID** | The stream ID for this search app. |
| **Client ID** | The client ID for this search app. |
| **Client Secret** | The client secret for this search app. |
9. Expand the **Knowledge AI** section (shown only when **Internal Information** or **External Information** is selected).
1. Turn on the toggle.
2. Select a channel.
3. Configure **Search Results**, **Pass Meta Data**, and **Control expand behavior of Answers**.
4. Optionally, add a custom meta filter script under **Advanced Search API Configuration**.
10. Select **Test Connection & Save**. A success message confirms the connection.
11. Repeat to add more Search AI apps.
#### Configuration Rules
* Choose either **Internal Information** or **External Information** with **Auto-Suggestions** — not both.
* You can't combine **Internal Information** and **External Information** in one app.
* **Auto-Suggestions** is available only for XO 10 apps.
* **Knowledge AI settings** appear only if you select Internal or External Information.
#### Knowledge AI
Knowledge AI settings let you control how search results from the Knowledge AI integration appear in the widget.
| Setting | Options |
| -------------------------------------- | ------------------------------------------------------------------------------------------------------------------------------------------------------------------------------------------------------------------------------------------------------------------------------------------------------------- |
| **Search Results** | **Always Show** (default) — shows all Knowledge AI results.
**Show with XO results** — shows results only when bot events are detected.
**Show as Fallback** — shows results only when no bot events are detected. |
| **Pass Meta Data** | **Landing Summary** — passes the landing summary and enables context-aware search results.
**Agent-Customer Chat History** — passes the conversation history between the human agent and customer up to the latest message.
**User Context** — passes the user context data to the Search AI app. |
| **Advanced Search API Configuration** | Use a custom API to configure Knowledge AI behavior. |
| **Control expand behavior of Answers** | Set how many answers appear in the widget (default: 4, minimum: 2). |
***
## Agentic Configurations
Agentic Copilot manages end-to-end conversations autonomously once configured. Agents supervise conversations and can cancel, override, or edit Agentic responses. Agents can also use the **custom tab** to run dialog tasks and perform LLM-powered searches.
### Configure an Agentic Copilot App
Configuring an app is a three-step process: entering app details, selecting conversation metadata, and adding custom metadata.
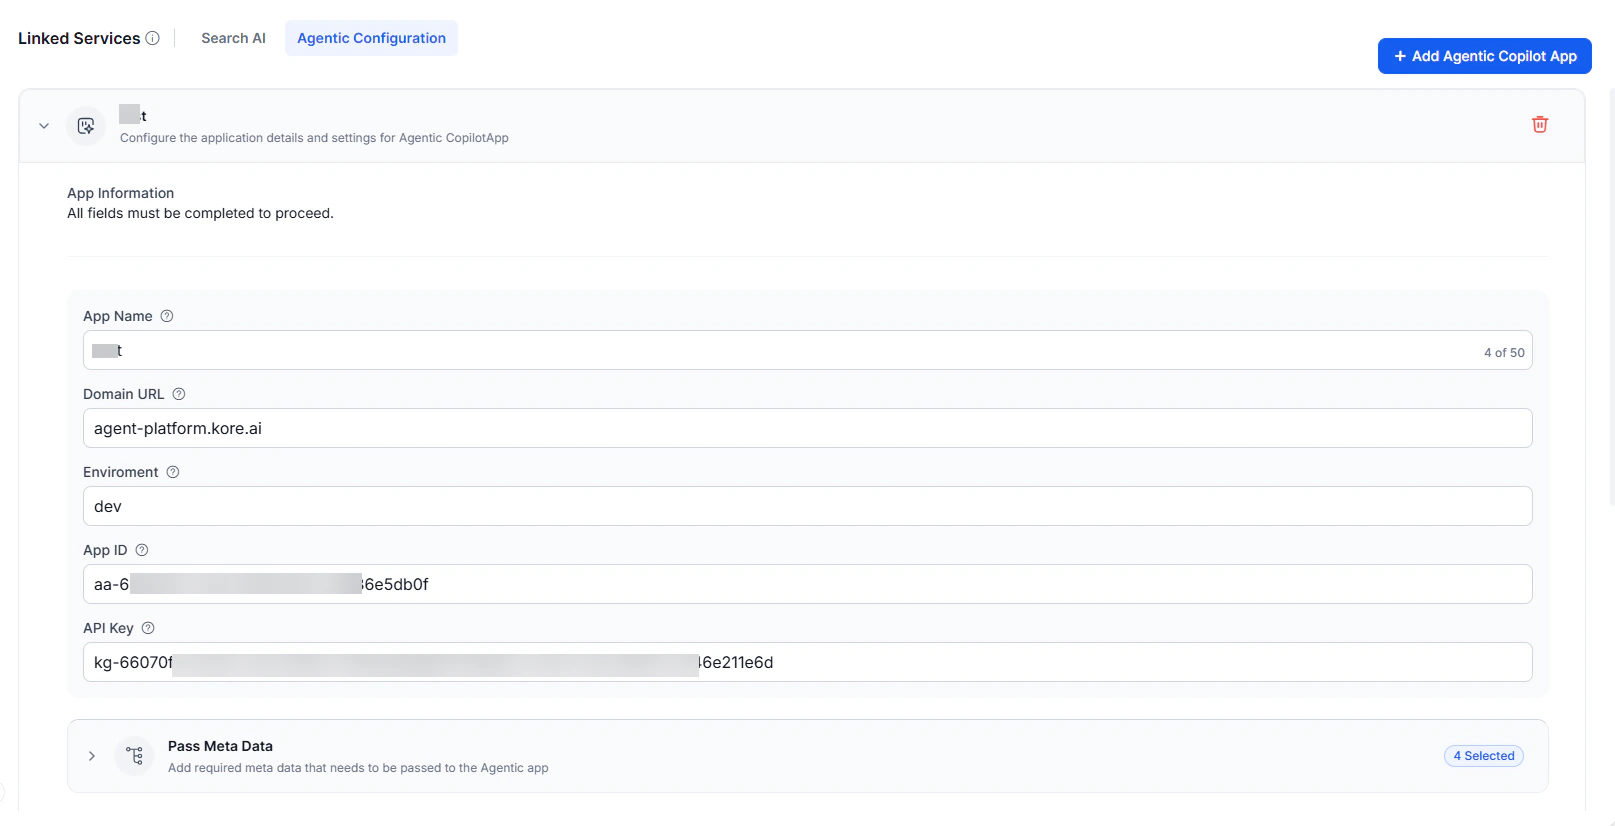
#### App Details
| Field | Description |
| --------------- | ------------------------------------------------------------------------------------- |
| **App Name** | A name for the app (up to 50 characters). For example, *Travel Agent*. |
| **Domain URL** | The Agentic platform's host URL. For example, `agent-platform.kore.ai`. |
| **Environment** | The environment name as configured in the Agentic Platform's **Environment** section. |
| **App ID** | The Agentic app ID in use. |
| **API Key** | The API key from the Agentic Platform's **API Keys** section. |
#### Conversation Metadata
Select the metadata to pass to the Agentic Copilot app. This preserves context during transfers from automation to human agents.
| Metadata | Description |
| ------------------------------- | ----------------------------------------------------------------------------------- |
| **Landing Summary** | Summary of the customer-bot conversation before transfer to a human agent. |
| **Agent-Customer Chat History** | Conversation history between the customer and human agent up to the latest message. |
| **Custom Data** | Collected custom data. |
| **Intermittent Summary** | Agent-generated mid-conversation summary. |
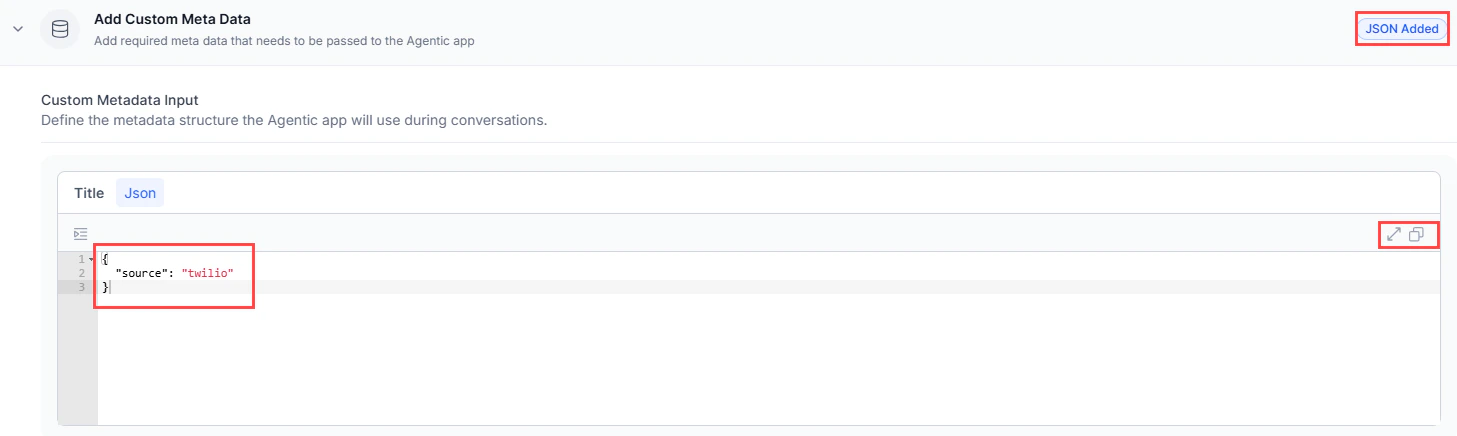
#### Custom Metadata
Add a custom metadata script in the code editor to pass to the Agentic Copilot app. The system validates and highlights errors as you enter the script.
**Steps:**
1. Sign in to AI for Service.
2. Go to **Agent AI** > **Configurations** > **Linked Services** > **Agentic Configuration**.
3. Select **+ Add Agentic Copilot App**.
4. Enter the app name, domain URL, environment, app ID, and API key.
 5. Expand **Pass Metadata** and select the metadata to pass.
6. Expand **Add Custom Metadata** and enter your script in the code editor. Use the enlarge or copy buttons as needed.
5. Expand **Pass Metadata** and select the metadata to pass.
6. Expand **Add Custom Metadata** and enter your script in the code editor. Use the enlarge or copy buttons as needed.
 7. Select **Test Connection & Save**.
***
### Delete an Agentic Copilot App
Deleting an app automatically disables it from the Agent AI widget.
1. Select the delete button on a saved app.
2. Select **Delete** on the confirmation screen.
You cannot delete an app that is currently in use. The delete button is unavailable, and a badge indicates the app is active.
***
Built with [Mintlify](https://mintlify.com).
7. Select **Test Connection & Save**.
***
### Delete an Agentic Copilot App
Deleting an app automatically disables it from the Agent AI widget.
1. Select the delete button on a saved app.
2. Select **Delete** on the confirmation screen.
You cannot delete an app that is currently in use. The delete button is unavailable, and a badge indicates the app is active.
***
Built with [Mintlify](https://mintlify.com).